Saturday, 31 December 2011

more complcated pieces :/

Today was sill closing :)
What a pita it was too :)

It is difficult to show the complicated shape of the 3 seperate panels that make up the sill closing piece.

I also seam welded around the plates I did yesterday as it turn out to be a weak spot in the shell, might as well do it now while it is clean and in bits :)

Friday, 30 December 2011

Suspension strengthening :)

Hours spent on the Datsfun today.
The rear floor was looking a bit tired so I knew underneath the layers would be worse, I was right.
Chopped out the floor layer and the front of the rear seat area to get to the reinforcing panel.
That was then removed to get to the rear chassis leg end. After I cleaned it up I had to replace the end of it.

The reinforcing plate was put back and the front of the rear seat area followed.

Then the floor was laid, the corner of this area was guess work as there is nothing original to work on :/.
I can now replace the last piece of inner sill and rebuild the front of the inner arch ready for the outer sill.

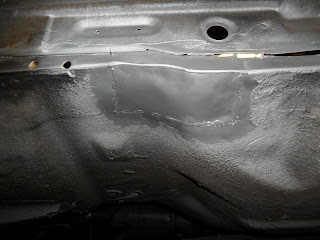
From underneath shows the plug weld penetration.

Thursday, 29 December 2011

Doors!!

I got the camera out today to show you the new doors :)


Now need to rebuild front wall to match :)

Wednesday, 28 December 2011

The Van of shite

I needed to move some stuff around so a van was needed and a friend at work was having trouble selling his Scrote so a silly offer later I had a van with 12mnth MOT :)
Today I got round to laying some stickers on it :)
Need to get the phone numbers and web addy on and all will be good :)


Also fitted new doors to the workshop today, picture fail :(, and a bit more on the Datsfun again a picture fail :(

Tomorrow I will do better :)

Tuesday, 27 December 2011

Today I got the front floor/inner arch, inner sill and outer sill behind wing sorted :)


Action shot :)


Monday, 26 December 2011

back again

Had some time in the man cave today.

I did some more cutting and decided on first patch..


So I chopped out all the offending brown stuff...


And put some clean zintec in...


This is going to be a headache, behind this panel is the rear suspension mount, you can see the vertical spot welds. Three panels thick including the mount and access isn't good except from here.


Saturday, 24 December 2011

Intro

My name is Grunty and I am addicted to rusty things :)
I learnt to weld many years ago when my boss said " there's a rusty Transit in the yard and there's the welder" Oh I said and set to it, always up for a challenge :)
Very quickly I started on other peoples cars so bought my own welder and haven't looked back.
That was the start of a hobby that has allowed me to repair some lovely old cars and keep many out of the scrappy.

This is just a record from now as I want to build a portfolio of my work.

I am not a rivet counter and am not put off by a car that has been welded as long as it was done properly. There are welders that will weld a car and you won't know they have been there but unfortunately I don't have the patience for that. My welding is done to a high standard and I do not hide it unless it is exterior body work.

I also do fabrication of other stuff as well, tractor linkages, gates, security doors and even wooden structures too.

If you have a car that needs love you know where to come.

Wednesday, 26 October 2011

warming up..

As my shed is getting cold I thought a source of warmth was in order.
I visited a local scrap yard and found an old gas bottle that he was stuck with so only to happy to lose :)

After carefully removing the valve and filling with water for a week I set about modifying it.

First job was cut a hole in the top to fit a flue stub, I fitted the stub with a flue damper so the chimock could be shut off.


I cut the bottom ring off the bottle and cut in into 4 sections, 2 large and 2 small. The large pieces were to make a stand, or legs, for the burner so I could stand it on any surface without worry. The base of a wood burner does not get too hot as the wood burns on a bed of ash which keeps the base insulated.
I then cut a hole in what was the base to make a door and the 2 small pieces of the base ring were then used as the hinge along with some m10 nuts and an m10 bolt.

This is where it is as of today.

Next time i need to fit a door catch and some method of sealing it. Also an air control so along with the chimney damper I can control the heat output.